Wednesday, December 31, 2008

Button Up: A Business Card Holder, Some Fashion, and a Little Blog Candy!

Baby, it’s cold outside…but that’s not why I’m buttoning up today. Instead, I’ve been busy playing with buttons. This fashion accessory puts the fun in functional, and it happens to be one of my favorite craft companions.

Here’s a business card holder I made for my cousin.

I hid a magnetic snap behind the felt flower and button…

And another magnet behind this piece of fabric, so those cards are going to stay put in their cozy little home.


When it comes to fashion, buttons don’t have to stay on your clothing. I made an assortment of button rings, with nothing more than a few fabulous brads, some sassy buttons, and ring findings.

Do you like? If so, I hope you’ll take a minute to check out my complete collection of button rings on Happiness on a String. I have many more in the works, so please check back again soon.

So, my friends, as you prepare to welcome the New Year, don’t forget to button up…whether you’re going out to face the elements or just plan on staying inside to play.

Speaking of, what are your New Year’s Eve plans? Doing anything fun? Leave me a comment and let me know what you’re going to do to kiss 2008 goodbye (or what you love about buttons). From the comments received by Saturday, Jan. 9, I’ll send two lucky celebrators a new button ring. Might as well start the New Year off on a fashionable foot, right?
Cheers!
P.S. Talk about starting the new year off right. I was asked to be a guest blogger on the super terrific Moxie Fab World Blog. It's a hot spot for the latest trends and trend setters, hosted by Paper Crafts magazine's Creative Editor, Cath Edvalson. What a fun opportunity! If you have time, please take a minute to check out what I have to say. While you're at it, let me know if you agree with my takes on 09 trends. (Thanks for the invite, Cath!)

Sunday, December 21, 2008

Christmas Countdown: Tag, You're It!

I love making gift tags. They’re super easy, require very little supplies, and make any gift look happier. Here are a few holiday tags I whipped up:

WREATH TAG
Step 1: Punch scallop circle from green cardstock and punch two small holes in circle with a hole punch.


Step 2: Thread button on red twine, put ends of twine through punched holes, and knot twine to secure button to tag.


Step 3: Punch small scallop circle from white cardstock and adhere to the center of green scallop circle. (This is where you’ll write your “To” and “From” information.) Add rhinestone “berries” to wreath to complete look.


ORNAMENT TAGS
Remember that ornament card I showed you last week? Well, here’s an idea for using the leftover shape:


STAR TAG
This is a tag my manager (and CK’s editor-in-chief) Brian Tippetts made for our editorial team. He die-cut a star shape, which he used as his template. He positioned the star on the white circle, punched two holes at each point, set the star shape aside, and connected the dots with red yarn. Pretty fun, don’t ya think?


GROUP TAGS
My friend P. Kelly and I (more her than I) recently started a new card-swap group with some of our co-workers. For our debut meeting, we each made and exchanged handmade tags. Take a look at the great tags they created. So creative!


Tag, you’re it. Do you have any creative ways to make your mark on packages? Whether it’s luggage-tag gift tags, fabric tags, photo tags, or something else entirely, I’d love to hear (read) what it is you do. Won’t you take a minute to share?

Cheers!

Friday, December 19, 2008

Christmas Countdown: Winners & Free Tags

A day late and a dollar short…that’s my motto. So sorry that I didn’t post my winners yesterday. To make it up to y’all, I’m going to give away three bracelets. Please forgive my tardiness.

Before I announce the winners of my bracelets and my autographed copies of Snippets, I’d like to thank all who left comments. Your jewelry feedback is much appreciated. Jennafer and I will take it as market research. And your Snippets stories are heelarious. Thanks for making me laugh. If you haven’t had a chance to read them, you should. Just click on the comments for that post. (Layle, your story isn’t exactly funny…but it does make me feel better about my eye mishap.) ;)

Okay, let’s get to those names. The winners of my handmade bracelets are:

1. Latisha
2. Angela (Cardas Photography)
3. Emilie


And the winners of my autographed books are:

1. Shaunte: Your story made me laugh and laugh and laugh! Then, I read it to my husband and he laughed and laughed. It was THAT funny! LOL
2. MANDEE: That silly kiddo of yours. Where’d she learn such a question? ;)


Please e-mail me (M2E2G@aol.com) with your full name and mailing address, and I’ll get your prizes shipped. If you're one of my bracelet winners, please also include your favorite color(s) so that I can customize your prize. :)

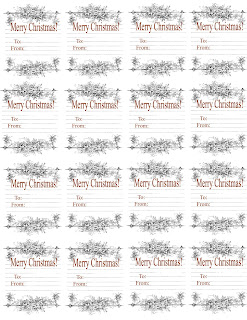
Now, on to something that everyone wins—free holiday tags. My cute friend Sharon Laakkonen made these and sent them to me. She didn’t have a reason, she just wanted to be nice and share the tag love. So, I asked her if I could pay it forward and share her amazing design with you, being the giving season and all. Naturally, this kind gal said yes. Thanks, Sharon.

Simply right-click on the tag image below and save the jpg. Then, open a blank Word document, insert the image and hit “print.” You’ll have a sheet full of beautiful, unique holiday gift tags.

Tip: Save time (and tape) and print them on label paper for an automatic sticker sheet!


Let’s conclude with today’s holiday song. All I want for Christmas is Mariah Carey's figure, but that's not going to happen, so I guess I'll go with an MC song: All I want for Christmas is You. I remember when my best friend and I would dance around my bedroom to this song, belting out the lyrics at the top of our lungs. Except I would replace all "baby" with "Brenty," because I had a huge crush on my friend Brent at the time. LOL Silly 14-year-old girls. Maybe I'll dig up the video of that and share it with ya one of these days. (Yep, we actually taped our "music video.") Until then, enjoy this awesome diddy. It has an extra special surprise in it for ya, so keep watchin.' Let's just call it my little holiday gift to you! :)

Enjoy! (click to watch)

Tuesday, December 16, 2008

Countdown to Christmas: Pretty Pail & Tag


Other gift-wrap ideas are going to, ahem, pail in comparison. This is an affordable, easy way to give a little something. Here’s how it’s done:

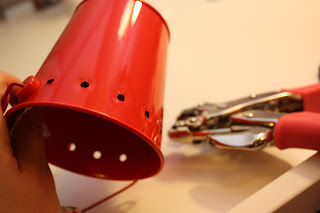
Step 1: Punch holes in a metal pail near the top of the rim (2-4 holes between each handle). I got this cute, bitty bucket in the dollar aisle at Target. Love that place, even if some of the items aren’t really a dollar.


Tip: Punch an even number of holes to make weaving align.

Tip: Not all hole punches are created equal. Be sure you use a hole punch that’s strong enough to punch through metal, like the Crop-a-Dile from We R Memory Keepers.

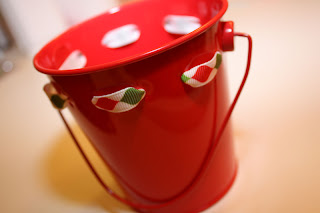
Step 2: Weave ribbon through holes, starting from the inside of the pail and weaving out.


Step 3: Adhere rhinestones between ribbon.


Supplies:
Ribbon (American Crafts)
Rhinestones (Doodlebug Design)
Hole Punch (We R Memory Keepers)
Metal Pail (Target)

And here’s how to create the tag:

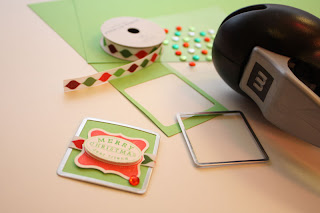
Step 1: Stamp “Merry Christmas” in red ink and again in green ink on white cardstock.

Step 2: Punch stamped images out using shape punch.

Tip: Turn punch upside down and position stamped element before punching.

Step 3: Trim center oval of green stamped image out with scissors.

Step 4: Adhere trimmed element to red stamped image using dimensional adhesive (foam squares).

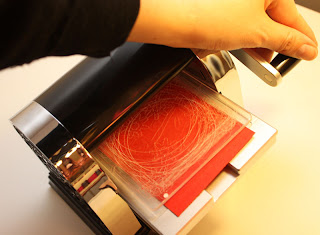
Step 5: Punch square tag from green cardstock and frame with a metal rimmed tag (I used the Tag Maker from Making Memories).


Step 6: Wrap piece of ribbon around the center of the green tag, adhere stamped “Merry Christmas” piece, and add a rhinestone.


Supplies:
Merry Christmas Stamp from Cute & Curly set (Stampin’ Up!)
Shape Punch (Stampin’ Up!)
Green Cardstock,White Cardstock
Red Ink, Green Ink (Stampin’ Up!)
Rhinestone (Doodlebug Design)
Square Punch
Ribbon (American Crafts)
Dimensional Adhesive (Stampin’ Up!)

Fill this bucket with candy, use it to contain a gift card, stuff it with tiny toys, or, if you want to get super crazy, fill it with cash. This is also a festive way to package neighbor and/or coworker goodies. I hope you like!
On to today's Christmas song. I'm choosing Where Are You Christmas by Faith Hill for a couple of reasons:
1. It's a pretty song.
2. As much as I don't want to be a downer, I relate to this song this year. Can you believe I don't even have a Christmas tree up in my house? How sad and lame is that?! This has been a harder year than most, and I think it's managed to suck out most of my Christmas spirit. Yes, me, THE Christmas girl. Here's hoping I find that magical Christmas feeling soon. And, here's hoping YOU have already found it and are enjoying this beautiful season.
Merry Christmas, friends!

Monday, December 15, 2008

Countdown to Christmas: A Giveaway and a Laugh


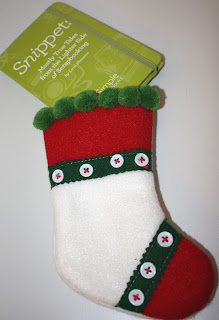
Christmas is about giving, so it seems appropriate that I have another giveaway, don’t you think? How does an autographed copy of Snippets: Mostly True Tales from the Lighter Side of Scrapbooking sound? This is a new book from Simple Scrapbooks magazine, that’s full of humorous tales from author Lain Ehmann. It’s a bitty book that would make a great stocking stuffer for any scrapbooker on your list (including you). (Plus, it was designed by the amazingly talented Cathy Zielske, which means it's as cute as it is funny.) Read a few sneak peek essays here.

Do you want a copy signed by Lain? If so, please leave a comment, stating a silly thing that’s happened to you. This can be a scrapbooking adventure, or something else entirely.


From comments received between now and this Wednesday, I’ll randomly select two winners to receive copies, just in time for Christmas. I can’t wait to read your stories. I’ll get thing started with this nugget:

My story is about beauty…sort of. In Jr. high, my girl friends and I were always painting our nails. We would add stickers, use lots of colors, and even use sented polish, all in an effort to have cute nails. Then we decided to step it up a notch and wear press-on nails, so we bought the kit at the store, complete with the ultra strong fingernail glue. You know, the kind that gets warm on contact because it’s sooo strong? Well, one morning before school I was reaching for my eye drops, which happened to be in a bitty bottle about the same size and shape as my press-on nail glue. You know what happened, don’t you? I grabbed the glue and gave it a squeeze. I glued my eye shut and had to spend the day in the eye emergency center. (Yes, there is such a place.) I then had to wear an eye patch to school for a week…IN JR HIGH. Not fun at that time, as you can imagine, but pretty amusing now. I hope it made you smile.

I can’t wait to read your silly stories. :)

Saturday, December 13, 2008

Happiness is Here...and a Giveaway!


Hip Hooray! Happiness On a String is open!

That’s right, my friend Jennafer Martin and I have opened the “doors” of our handmade jewelry and accessories business, just in time for the holidays. Won’t you check it out? The details are below, including a free shipping offer. Sweet!

Click on the image to see a larger version of the file.

Also, as a little holiday gift to you, I’m going to giveaway two bracelets to you, my fun blog readers. All you have to do is leave a comment on my blog, stating your favorite item from all of the Happiness On a String inventory (I’m taking a little informal poll here). I’ll randomly select my winners from the comments received between now and next Wednesday, Dec. 17. I'll announce the winners on my blog next Thursday, Dec. 18.

Thanks for playing my little game and helping us spread the Happiness. I hope you like our joyful little shop!

Thursday, December 11, 2008

Countdown to Christmas: Candy Stick Mailing Tube


I did a little Christmas shopping this evening. Dillards is having a HUGE sale right now (until Sunday, I think) that you don’t want to miss. All purses are 30%+ off, and that includes the big brands like Coach. I sh*& you not! The sale is storewide, so you’ll also want to hit the shoe department for some amazingly priced goodies.

Okay, it’s project time. I imagine you have some wrapping to do, eh? (If not, you will after you hit the Dillards sale.) Here’s an idea for wrapping any number of things—socks, a shirt, a scarf, candy, a gift card, etc. Let’s take a peek at how I made my candy cane tube.

Step 1: Cut white paper to fit mailing tub using a craft knife.

Step 2: Adhere paper to tube, leaving a few millimeters of extra paper at each end.

Step 3: Tape end of ribbon to inside of tube on one end.

Step 4: Wrap ribbon around the tube.

Step 5: Repeat with a second piece of ribbon. Secure wrapped ribbon pieces to bottom end of tube with tape (on inside of tube).

Step 6: Attach real candy sticks to center of tube with tape, wrap a piece of twine around tube, and add a tag.

Supplies:
White Paper
Christmas Stamp Set (Technique Tuesday)
Red Ink (Technique Tuesday)
Mailing Tube (Xpedex)
Red Polka Dot Ribbon (American Crafts)
Red Twine
Candy Sticks

The hardest part of this project – finding the candy sticks. I ended up getting them at the candy store at Gardner Village, but that’s because I made this back in Oct. I have a feeling peppermint sticks are easier to find this time of year.

A’ight. It’s time for my holiday song. This is a Christmas song, but, from the looks of these dancers, it may also works as a Halloween harmony. Let’s have a little listen to some Linus & Lucy:


And, just for fun, check out this rendition, where the Peanuts gang dance to Hey Ya by Outkast:


Well, my friends. I’m off to wrap my fun Dillards gifts. Happy crafting!

Sunday, December 7, 2008

Countdown to Christmas: Cards and Carols


‘Tis the season for happy mailboxes. The Christmas cards are coming. Don’t you just love the break from bills and junkmail? The first of our holiday cards this weekend. Yeehaw! (Thanks, Aunt Ruby and Cynthia.)

In the spirit of holiday cards, I’m going to start this Countdown to Christmas blog series with a little card I created for a class I taught for the U of U. It combines two of my favorite things—paper and yarn—to make an ornamental window card. Let’s take a look at how I made this little number:

Step 1: Make card base from cardstock.

Step 2: Die-cut ornament shape from a 4” x 4” piece of cardstock. Set the ornament piece aside. (I'll give you an idea of how to use it in a future project.)
Tip: If you don't have a die cut machine, you can trace an ornament on your cardstock with an ornament shaped cookie cutter.


Step 3: Adhere negative shape (the cardstock leftover piece that you cut the ornament from) to the center of the card base.

Step 4: Open card and position on cutting mat. Use craft knife to cut white center out from inside ornament-shape to create window, leaving the piece at the top in tact (see card photo).

Step 5: Punch holes around ornament shape. (Note: In this sample I didn’t create a window, but the threading is the same.)
Tip: Most hole punches will not reach the entire width of your card. For the holes that your punch won’t reach, use a large thumbtack to piece the holes. You can also purchase the Big Bite from We R Memory Keepers, which has a much longer reach than most punches.

Step 6: Secure one end of the thread on the inside of the card with a small piece of tape, and thread green yarn through holes. Once entirely threaded, secure second end of yarn onto inside of card with tape.
Tip: If you don’t have a needle, you can wrap a piece of tape around the end of your yarn. This makes the yarn rigid so that it will go through the holes easier.

Step 7: Tie a small piece of yarn around the top of the ornament to complete your look.


Supplies: Cardstock (red and white); Ornament Die, Die Cut Machine (QuicKutz); Green Yarn; Hole Punch; Tape

Techniques: Hand Stitching, Using a Negative Shape, Die-Cutting

Quite the ornamental idea, eh? I hope you like.

Do you have holiday cards posted somewhere? If so, I’d love to see a link to where they’re posted. I’m always looking for new card ideas.

Now, on to my holiday song pick for this post. I know it’s just about impossible to narrow down the many wonderful Christmas songs down to a single favorite, but “Have Yourself a Merry Little Christmas” comes pretty close for me. Take a listen:


What about you? What’s your favorite festive tune? I’m going to post a new fav with each of my holiday posts (a little like adult easy listening radio, I know, but I can’t resist). Maybe we’ll have a few favs in common.

In addition to sweet songs, I’m going to post more projects and a giveaway or two, so please check back when you can. Until then, have yourself a merry little day!
P.S. For more holiday countdown ideas, check out the always-inspiring Ana Cabrera's blog. You'll be glad you did. :)

Thursday, December 4, 2008

Pssstt...I have news.


I’ve been waiting for the official announcement to go out at work. Now that it has, I’m excited to share my news with you. I have a new job. You’re looking at the new Creative Editor for Creating Keepsakes magazine…well, technically, you’re looking the blog of the new CE for CK, but you get the idea.

For those of you who don’t know, CK is part of the same parent company as my previous magazine, Simple Scrapbooks (as well as Paper Crafts magazine, the cool pub I worked on before Simple). This makes my move a little easier, and a little bit more difficult. You see, I adore my Simple friends, and it’s going to be hard to see them everyday without being a part of their creative crew. But, this CK position was a move up the ole career ladder, it seems like an awesome fit with me/my professional strengths, and CK also has some pretty cool peeps.

So, I hope to be seein’ ya on the pages of CK when the April 09 issue hits newsstands. Until then, we always have our blog visits to look forward to. :) I’m going to do a Christmas Countdown on here soon, with a variety of festive ideas to share. Are you ready to fill up your cup o’ creative cheer? Here’s hopin’!